Showing posts with label pallet. Show all posts

Friday, August 23, 2013

Bathroom Reveal at the Boondocks House

Here is a quick tour of our super long and skinny bathroom :)
Before we moved in it had a odd vanity with no cabinets underneath and lots of water damage. But Reeds boss was so sweet and for a "house warming gift" they re did the vanity before we got here! Now it is a nice new vanity with lots of storage!  


This bathroom is pretty awesome when it comes to storage. We have more than we know what to do with! All I did to spruce them up was paint the back of the shelving with my favorite color  and scrounge up all the fun little containers we had randomly around the house. 


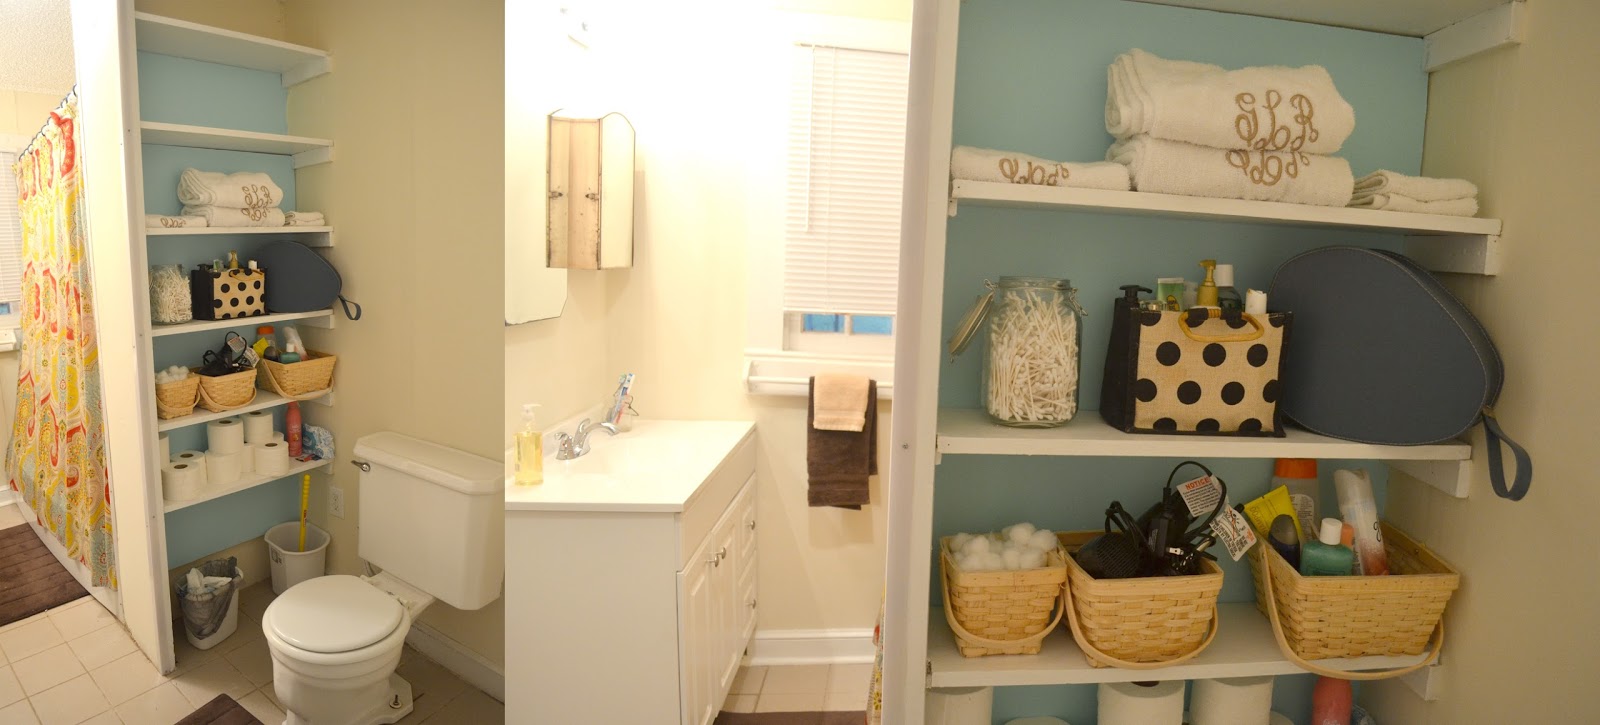
When they put the new vanity in the mirror was no longer center so it was kind of odd. When you stood at the sink you only saw half of your face in the mirror. BUT never fear because thrifty finds fix everything! I found this old medicine cabinet that fits perfectly next to the original which gives the awkwardness a little more purpose. 

And don't you just love the shower curtain! We got it as a wedding gift at Bed Bath & Beyond. The only thing I still want to figure out is how to make the room feel less yellow. I don't know why but sometimes the lighting in there is just soooooo yellow.

Heres a secret. This room was done the week we moved in. I just couldn't share because we had this one really long strange wall that I just didn't know what to do with. So just recently (this week) I quickly made this piece of art to go over the towel rack. Its not much but it takes up space and thats what I  needed it to do!


So anyway, thats our bathroom! Long skinny and always going to be a tripping hazard :) If you look at the first picture you can see how close the vanity is to the tub, literally it is just enough room to stand. The first week I fell back in to the tub countless times! But good news is I'm getting used to it and haven't hurt myself yet :)

I'm going to share next week how I made the new artwork, its an interesting fail turn success story so come back to check it out!

** And don't forget about the big reveal!! TOMORROWWWWWWW! Here is the sneak peak at what we plan to giveaway as part of the revamping process :) 


Saturday, March 9, 2013

Making New wood look weathered

So y'all know how much I like to paint on found objects. 
I've recently tried to find things that are easier to replicate so I can produce my items quicker with out so much of a hunt. 

I've decided to look into making my own pallets. 
I've done this before with found wood that is BEAUTIFUL. 
But it also weighed a TON and could really only be placed on a mantel and couldn't be shipped. 

Here is an example of one of the older, natural weathered pallets. 

(I don't have images for the first few steps but once we get to the staining I have plenty!)
What Reed and I decided to do was buy a sheet of 1/4 pine plywood to cut in to the plank sizes we wanted. What we did next was beat the wood up a bit by sanding ALL of the edges.
You can distress the wood with anything you have laying around. We hit it with both sides of the hammer, an old chain, and even knocked a bag of nails around to get a few different marks. 

I wasn't home when Reed was doing this part and so later we decided it needs to be done a little different. Reed put all of our boards together using extra scrap pieces, nails, and wood glue on the back with wire for hanging. While this was super sweet of him to do he did his steps backwards. 
Next time we decided that we will mix the boards up a bit more so the grain doesn't match and sand them/distress them BEFORE we put the pallet together. 

Again, sorry for the lack of images, but here is what our pallet looks like with out stain. 

Now this is the fun part. 
Staining the wood is what really gives it that ages/weathered look that so many people love about old pallets. While you can't replicate it exactly with out leaving it outside for a few months I've tried to find the closest stain to that lovely blue grey. 

What we used is 
Minwax Ebony and Minwax Dark Walnut stain. 
Latex gloves to protect your hands
water
foam brushes
a shop rag. 


We tried 2 different techniques. 
Our first technique we damped the wood with the rag and water.
Then brushed on a coat of ebony stain wiping off shortly after it was applied.
Then we went back over with the Dark walnut again wiping down with a rag. 
 

this is a better depiction of what it looks like after being wiped down.


This is really beautiful but is a little warmer (more brown) than what we were hoping but it is still very pretty. You can see more variation up close.

So for our second pallet we tried a little different technique. And I even have a video to share!!
(Please excuse my 5 year old girl voice, my squintched face, and crazy hair)

For those of you who 1. couldn't undrstand me 2. didn't watch the video or 3. like seeing words better here is a quick description. 
It is very close to the same process as before just changing a few steps around. 
First you really soak the wood with water. I used my spong brush this time to make sure I had a good amount of water sitting/soaking in to the wood. 
I then would brush on a small amount of JUST the ebony stain. Kind of scrubbing it around to make sure it gets in to the distressed areas and the grain of the wood. 
Then just like before you wipe down your wood soaking up what is left sitting on top. 


You can do this as many times as you like depending on how dark you want your final pallet to be. 
This is one layer over every board, then going back over in a few spots to draw out some variation. 
Sorry I don't have a better picture of this one hanging up but it looks a lot more naturally weathered than the first! I'm going to be using this technique from now on!!


Hope this is interesting or helpful in some way!
We are both so excited to know how to age our own wood now!
If anybody is looking for a pallet painting let me know, I've got two ready to be painted on :)

Monday, March 4, 2013

Long time no see!

Hey friends!
Sorry I have been off the grid for a week or two. 
Things have just gotten so busy and whatever free time I've had between school and other projects I just wanted to spend cuddling with the Tepster and Reed :) 

I have so much to catch up on for you guys. 
Lots of school projects that I think you'll like and even a few tangents of my own thoughts. 
But I've gotta take small steps to getting caught up cause I don't wanna miss anything! 

First I figured I would go back to the week of Valentines day. 
I did a few projects for customers of my Etsy shop that week and never had the chance to share. 

First was for some good friends and returning customers :) 
I have done 3 or 4 things for them in the past and so I was able to have a little more fun than normal with this piece. I was working on it for a while but I am so happy with how it turned out. 


Lots of fun trying to figure out a way to do the typical "house divided USC vs. Clemson" sign with a little more artistic flare. 

The second project was for a new friend and customer that saw one of my pallet paintings and wanted one for her boyfriend. She chose a quote that he knew well and let me kind of illustrate it as I saw fit. 
It took a while to do the script but we are both really happy with how it turned out. 

Finally. I've shared these pictures before but wanted to make more of a comment on them.
The weekend after Valentines day I did the photography for a friends small intimate wedding. 
( I'm still working on editing. I don't know how professional photographers do it!) 
But not only did I have the chance to try my hand at photography but I also got to do some of my favorite crafts :) 


This was the main decoration for the wedding and was seen as soon as you walked in the door. 
The theme for the wedding was "Love Is" going off of the verse  1 Corinthians 13:4-8. 
Instead of writing out the entire verse I went through and picked out some of the more predominant words/ phrases and wrote them on the pallet in different fonts. 

Once I finished this project I didn't want to send it away! 
I love it so much!
But it fit better on their mantel than it would have anywhere in our itsy bitsy house. 

Another kind of last minute contribution to the wedding was their "guest book". 
Lindsey & Rhett wanted something they cold keep in their house and asked me to come up with something they could frame later on. 
I've seen many of these thumb print guest trees and decided to go with that and just personalize it. 


Going with the theme "love is" I wrote out the verse, date, and their names beneath the tree that their closest friends and family would fill out with their thumb prints. 


It was so fun to be apart of a wedding and getting a chance to just make pretty things. 
And it was even better because it was for a family that I love. 

Now that I've caught yall up on my "fun" projects I can say I've checked one thing off my  list!
Now I've gotta catch you up on the Thankful Project, 5 week Review, New York, school and a fabulous dinner that Reed made me :) 

Tuesday, August 28, 2012

House Tour: Room 1

Alright, we have been officially in the house for 2 weeks and married only 3 weeks!
It has been SO FUN!! I love having friends over to our house.
Sitting on our sofa watching TV. 
Not having to go home at the end of the day. 
It has all just been so great. I know everyone says the real world will hit us soon. 
But I'm just looking forward to the years ahead. 
I love my new roommate :) 

Alright, this is our first house tour!! 
This is our living rooooommmmm! 
It is a pretty small room only 12x16 so I was really worried about fitting everything in. 
Luckily my mom loaned us the chair and love seat. 
I'm pretty sure it was at one time porch furniture.
But I love it and it fits pretty perfectly in our tiny house :) 
We also got that sofa for a pretty sweet deal off Craigslist for $100 bucks! 
Its a queen pull out and the microfiber has only one little stain on the back of a cushion. 
Finding this furniture was such a blessing. 


This is the other corner of the living room. 
Yes the glorious TV! 
Reed and I received this fabulous TV as a wedding present along with the blue-ray player. 
Of course Reed wanted bigger but our room (and me) would only allow for a 42 inch. 
I think it fits perfectly!!
The TV stand is actually something that my dad had left over from when he owned a hardware store.
It was a rack used to display cast iron skillets. 
Yep, just basic wooden sides with 2 gridded selves. 
The shelves can easily be moved to different levels.
Of course meaning we had to put the raccoon on the bottom shelf :) 

The image on the right is a painting that my grandmother did. 
I had it in my last apartment and hopefully my mom will let me keep it forever!

Now for some detail shots. 
These are all of the pillows that we have around the living room. 
I was planning to make my own pillows out of canvas and just paint them but
I was lucky enough to find all of these at great deals!
The 2 brightly colored smaller pillows I found at a local consignment store for $8 a piece! 
And the 3 larger ones I got on redtag clearance at Belk! 
Reed was getting frustrated with all of my pillow purchases but I think they are perfect for the room. 
And he should be happy that I got them all for great prices. :) 


Annnnd finally our trinket stand! 
We both have a lot of things we want to show off. 
Reed has his animals, I have my artwork. 
I've tried my hardest to incorporate them both in a some what cohesive manner. 
This bookcase was one Reed had and really didn't want to part with. 
At first I had no idea what we would fill it with or where we would put it,
but I am so glad that he made me keep it. 
Because now we have a perfect spot in the living room to display some of our favorite trinkets and gifts we have received over the years. 


I've shown these images before but I thought it appropriate 
to share them now that the room is finished :) 

Just a quick reminder. This is a piece of fencing that Reed and I got at Lowes. 
Check out how we built it here.


And this is the display over the sofa. 
I explain the significance of each piece on this post if your interested. 

We are both so happy with how our little living room has turned out. 
We spend a lot of time hanging out in it. 
Finally it has started feel like OUR house :) 

*PS> Reed has 2 more duck mounts coming in the next month or so. Help me figure out where would be good to add in TWO MORE animals!! 

Tuesday, June 26, 2012

House Project #3

 For project #3 I wanted to find something to anchor my artwork on the wall. I knew that in our tiny living room it could get cluttered real fast so I wanted to make sure that everything I displayed was some how anchored together. 
I went through lots of different ideas like cork board, peg board, painting a "frame", and finally landed on using a pallet. Being as lucky as we are at Lowes Reed knew of some fencing that was damaged and on sale for uber cheap. 
This project total cost was $5!! 
We used the damaged fencing from Lowes and squeezed the pickets together (we had to do damage control to just one picket!) to create one solid piece of fencing. 


After that we used heavy duty picture hangers to hang the fencing to the wall and I then tied pieces of twine and let them hang loose and then clothes pinned my different pieces of art to it! 

This way I can keep changing up the artwork with out putting another hole in the wall or worrying about framing! 
It also gave Reed another great spot for him to show off his 7.5 lb bass mount! 

The pieces I have hanging are some of my favorite prints from my photography classes and then my woodblock prints from beginning printmaking. I also put up some of my favorites from the print exchange. The Owl print was done by one of my best friends Emily, and the one on the top left is one that my teacher, Matt, did of a sort of Jungle Book inspired piece. (Matts pieces always have a great story behind them, if I ever get a written copy of his stories I will totally share, they will be more than worthy of reading!)

PS. I start my summer sculpture studio today and I am SUPER anxious!! I love sculpture and can't wait to get back in the studio, I just know that this is gonna make July fly by! I am getting a little overwhelmed about how fast August 4th is coming!!!! 


I used this post to Link up to the Uncommon Link party.
Go check them out!


Wednesday, January 25, 2012

real quick

Alright, I'm exhausted. Being engaged totally wipes you out. I've only been engaged for 2 weeks and I'm tired of looking at wedding stuff. It is time to make stuff happen!!
So, I would really love to chat with you guys but I'm tired.
 I have a crazy schedule this semester plus planning a wedding.
So here is a little bit of what I have been doing.

1. Another pallet project for a client of Erin Galloway.

2. And this is a pair of TOMS that my little sister got for Christmas so I could paint on them :) 


Sorry this is kinda boring. I'm just tired. I've got a lot going on but in a little over a week I will have my first 3 assignments from studio to share!

Sunday, January 8, 2012

A Pallet Project

This is my biggest project from the holiday season. A family that goes to my church is having their living room redecorated by Erin Galloway Interiors and I was picked to provide a piece of art! They wanted a textured, rustic piece that depicted their two young daughters and lyrics from "You Are My Sunshine". 

I'll just give you guys an overview of how I did it :)
This was just some wood we had at the house so I got my brother, JB, to help by cutting the boards in to 40 inch pieces.  I then placed them the way I wanted and screwed them all together. 


I then sketched out and painted the two girls and lyrics. This was fun because I wanted to keep it wispy and rustic so I was able to use a quick dry brush effect.


I just delivered the pallet this evening and they LOVED IT! I was so excited because we honestly didn't do much talking about what they wanted which left lots of wiggle room. Wiggle room is great, but is also kind of nerve racking because it lets me create what I personally want but not necessarily what they want. Luckily I  nailed it and they already have it up in their house! 


I have been unbelievably blessed with friends and family who continuously support me in my art endeavors. Erin has taught me so much about how to price my work and she has gotten me numerous jobs that I would have never gotten with out her. It is so exciting to feel like I am really getting my work out there! I can't wait to get this going and possibly grow it in to a real business.  

I'm heading up to Clemson tomorrow! I can't wait to get back and start my classes on Wednesday!!! 
Related Posts Plugin for WordPress, Blogger...